
31 July 2012


23 July 2012
peace camp
I spent the weekend up in Coleraine. We went to see the Peace camp at Whitepark Bay on Saturday night. The Peace camp was inspired by the United Nations Olympic Truce. It was an installation by Deborah Warner and Fiona Shaw. I thought it was great - I've never been to a beach at two in the morning before. Wandering through the tents the music from the tents and the sound of the waves was a great experience.
Here's some photos to share the night with you
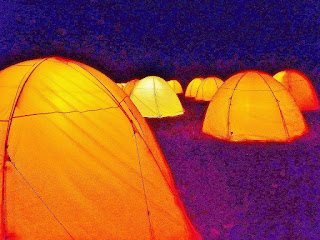
My son was a very reluctant model for this photo but he managed to stand still for two seconds while I took the photo.


Here's some photos to share the night with you

My son was a very reluctant model for this photo but he managed to stand still for two seconds while I took the photo.

This photo was taken the next day. Its White Park bay from Port Bradden ...you can just about see the dots of the white tents on the beach.

Bye, ali20 July 2012
titanic pall
titanic pall
I have lived in Belfast all of my life and have only been to St. Anne's Cathedral once. Today, I went especially to see the embroidered Titanic funeral pall. It is truly beautiful. The background is merino felt which has been indigo dyed and represents the deep midnight ocean.
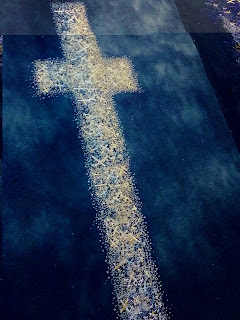
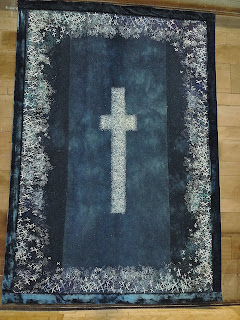 The large central cross is made up of small embroidered crosses and there are more crosses towards the edge. It is bound with velvet.
It was made by Helen O'Hare and Wilma Kirpatrick, from the University of Ulster. Despite its function I didn't find it morbid, but a beautiful piece of art.
The cathedral itself has amazing stained glass windows, the new spire and mosaics. This one depicts earth, water and fire.

I lit a candle on the way out and must confess to saying a wee prayer even though I'm not particularly religious.
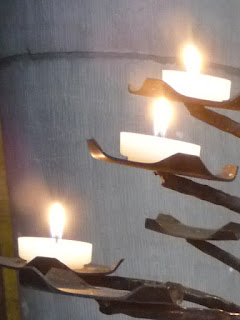
Bye for now, Ali
I have lived in Belfast all of my life and have only been to St. Anne's Cathedral once. Today, I went especially to see the embroidered Titanic funeral pall. It is truly beautiful. The background is merino felt which has been indigo dyed and represents the deep midnight ocean.


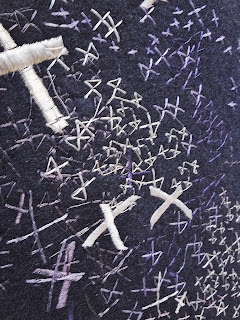
On close examination you can see abstract gold crosses, Star of Davids and crescents. There are 1,517 of these which represent the number of people who lost their lives in the disaster.
It was made by Helen O'Hare and Wilma Kirpatrick, from the University of Ulster. Despite its function I didn't find it morbid, but a beautiful piece of art.
The cathedral itself has amazing stained glass windows, the new spire and mosaics. This one depicts earth, water and fire.

I lit a candle on the way out and must confess to saying a wee prayer even though I'm not particularly religious.

Bye for now, Ali
2 July 2012
new freebie pattern
I bought a few of these egg cups with feet a while ago and have been meaning to knit wee jumpers for them. Just got round to it last week - so at least thats one thing ticked off the to do list!. The wee jumper is knitted with dpns with minimum sewing required. Hope someone can make use of it....see below.
Bye, Ali.
Bye, Ali.

YOKE SWEATER EGG COSY
THIS PATTERN IS COPYRIGHT PROTECTED. DO NOT REPRODUCE PATTERN. DO NOT SELL ITEMS KNITTED FROM THIS PATTERN FOR PROFIT ONLY FOR PERSONAL OR CHARITABLE USE
rd(s) : round(s)
k : knit
p : purl
M : make
st(s) : stitch(es)
rpt : repeat
tog : together
Materials
small amounts of dk (US 8ply) yarn - suggested yarn Rico baby classic dk
4 dpns size 3.25mm (US 3)
SLEEVES (make 2)
Cast on 10 sts in blue, join in the rd (4,4,2) and place st marker.
Rd 1 : (k1, p1) rpt to end of rd.
Rd 2 : (k1, p1) rpt to end of rd. Change to pink yarn.
Rd 3 : k.
Rd 4 : k.
Rd 5 : k.
Rd 6 : k1, M1, k to end of rd (11 sts).
Continue with k increasing every 4th rd until 13 sts.
Continue with k until work measures 5cms (2ins) from beginning of work.
Place sts onto a spare contrasting piece of coloured yarn.
Break off sleeve yarn leaving a long tail for sewing up.
BODY
Cast on 38 sts in blue, join in the rd (12, 14, 12) and place st marker.
Rd 1 : (k1, p1) rpt to end of rd.
Rd 2 : (k1, p1) rpt to end of rd. Change to pink yarn.
Rd 3 : k. Continue with k until work measures 5cms (2ins) from beginning of work.
JOIN BODY AND SLEEVES
k1 of body, place the next 3 body sts onto a piece of spare yarn
Place first sleeve in the position it should be in relation to the body keeping the increases pointing in towards the jumper body.
Place 10 sleeve sts onto the left hand needle (start with the last st of the sleeve rd and move anticlockwise) leaving 3 sleeve sts on the yarn these 3 sts should align with the 3 sts of the body on the yarn, this will be the underarm.
k 10 sleeve sts.
k 16 body sts, place the next 3 body sts onto a piece of spare yarn.
Place 10 sts of the second sleeve onto the left hand needle leaving 3 sleeve sts on the yarn these 3 sts should align with the 3 sts of the body on the yarn as before.
k 10 sleeve sts.
k 15 body sts (52 sts).
YOKE
Change to blue.
Next rd : k.
Change to pink.
Next rd : k.
Next rd : (k2tog) rpt to end of rd (26 sts).
Next rd : k.
Next rd : k.
Next rd : (k2tog) rpt to end of rd (13 sts).
Next rd : k.
Next rd : k.
Next rd : (k2tog), k3, (k2tog), k2, (k2tog), k2 (10 sts).
Change to blue.
Next rd : k.
Next rd : (k1, p1) rpt to end of rd.
Cast off in rib.
To Assemble
- Using the yarn tails in the underarms sew any gaps and weave back and forward the 3 sts of the sleeve and the 3 sts of the body.
- Weave loose yarns away.

copyright Alison Hogg 2012
17 June 2012
mossley mill exhibition
I took myself off yesterday to the Mossley Mill, Newtownabbey, to see the "Stitching the Legend" Exhibition. It is the work of a small cross border group of textile artists from various parts of Northern Ireland and Ireland. I fell in love with Ester Keily's work. She has wall hangings, panels and notebook covers displayed.....all amazing.
Here are photos of one of her panels - "Salt fell like Snow"


The exhibition is open until the 30th June, so still time to go.
Bye, Ali.
Here are photos of one of her panels - "Salt fell like Snow"


The exhibition is open until the 30th June, so still time to go.
Bye, Ali.
13 June 2012
wip
The days seem to be flying in and I don't seem to be achieving much. I had lots of plans and a long to do list for when my class stopped. I am however working on a new pattern. Last year I wrote up a knitted mini doll with fabric clothes which is for sale on my etsy / folksy shop. I'm now working on knitted clothes for this mini knitted doll. It would be a good stocking filler or item for a party bag.
Here's a sneak preview.......

Here's a sneak preview.......

bye for now, Ali.
3 June 2012
congratulations ma'am
What better way to celebrate the Jubilee than a nice British cuppa and a Union Jack bickie.

The red, white and blue petunias managed to bloom, just in time even if they were a bit battered by the rain.

Enjoy the Bank holidays, Ali.

The red, white and blue petunias managed to bloom, just in time even if they were a bit battered by the rain.

Enjoy the Bank holidays, Ali.
12 May 2012
rust dyeing
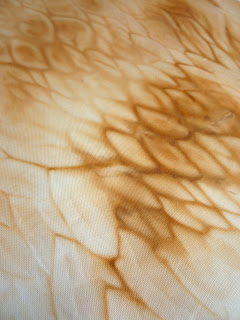
Part of the course I am doing at the moment is about experimenting with applying colour to fabrics. One idea I got was rust dyeing - couldn't be simpler
what you need -
how you do it

The fabric will colour in about a week, keep it moistened.
After a week untie fabric and wash and iron. The colour will be fast on your fabric.
Here is one of my samples.........these earthy colours aren't for me but the rusty fabric would look amazing with turquoise embellishment or stitching.
Small fragments of rust may remain in the fabric, which may result in broken needles if you are sewing on the machine. Fragments of rust might also find their way into the feed dogs, so inspect fabric carefully.

- natural fabric such as cotton or linen - synthetic fabrics can be used but the colour will be paler
- brown vinegar (cheap vinegar is perfect)
- rusty object / nails / filings etc
- wash the fabric you wish to use
- dampen cloth
- tie the fabric round the rusty object

- pour vinegar over the fabric
After a week untie fabric and wash and iron. The colour will be fast on your fabric.
Small fragments of rust may remain in the fabric, which may result in broken needles if you are sewing on the machine. Fragments of rust might also find their way into the feed dogs, so inspect fabric carefully.

It is also possible to dye over the top of the rust stained fabric. The rust staining shines through the dye. The sample below shows a rust stained piece of fabric, which has then been dyed firstly with a pink and then a purple cold water dye.

Thanks Faye, for your input in this post.
Bye, Ali
27 April 2012
even more flowers
Cant believe that this year is nearly over for the City and Guilds class. I have been churning out felt flowers like nobodies business...I have to make eight in total. I've learnt a lot from making these samples. The latest one is a nuno felt - wool tops felted unto a silk gauze. It has resulted in a very fine felt. The inspiration for this flower is clematis montana, there is a lovely one which overhangs into our garden, it is a mass of white flowers at the moment.
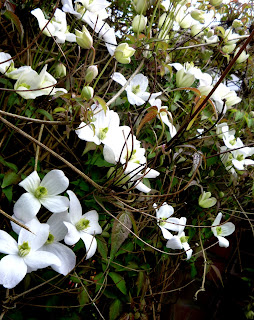
I wanted my felt clematis to look bridal....


I wanted my felt clematis to look bridal....


Take care and have a good weekend, ali.
9 April 2012
titanic light show
Living in Belfast I thought it was a must to write a post about the fated Titanic, this being the centenary year of it's sinking. On Saturday night we braved the cold and by gum it was cold down there at the docks to view the light show. The laser was projected onto the front of the distinctively shaped Titanic building, while fireworks were let off from the roof. The lights and fireworks led the audience through the stages of the life of the ship. My wee camera isnt the best, but the photos aren't bad for something handheld.......


6 April 2012
paper leaf easter tree
Easter has to be my favourite time of the year ....the hopefully warmer weather, the brighter nights, the blossom and spring flowers. In celebration I made a paper leaf Easter tree, inspired by a photo I saw on Flickr.
Here's how.....
What you need
twigs
coloured paper
glue
florists wire
scissors

Instructions
1. Cut out rectangles of coloured paper, approximately 2.5ins by 3ins (two rectangles needed per leaf)

2. Apply glue to one side of the paper.
3. Place florists wire down the centre of one of the rectangles.

4. Make a sandwich of two of the pieces of paper with the wire in the middle.

5. Press down the paper with your finger, paying particular attention to the edge where the wire comes out.
6. Using the wire as a central line cut out a leaf shape.

7. Twist the leaves round the twigs.
8. Add some Easter decorations.

Hope you all have a nice Easter. Unfortunately I wont be eating too many Easter eggs as I have just had the results of a cholesterol test!!!
Happy Easter, Ali.
Here's how.....
What you need
twigs
coloured paper
glue
florists wire
scissors

Instructions
1. Cut out rectangles of coloured paper, approximately 2.5ins by 3ins (two rectangles needed per leaf)

2. Apply glue to one side of the paper.
3. Place florists wire down the centre of one of the rectangles.

4. Make a sandwich of two of the pieces of paper with the wire in the middle.

5. Press down the paper with your finger, paying particular attention to the edge where the wire comes out.
6. Using the wire as a central line cut out a leaf shape.

7. Twist the leaves round the twigs.
8. Add some Easter decorations.

Hope you all have a nice Easter. Unfortunately I wont be eating too many Easter eggs as I have just had the results of a cholesterol test!!!
Happy Easter, Ali.
30 March 2012
morning glory
The weather has been just glorious this week. Great felting weather. I was able to do some rolling outside and dry felt pieces flat on the grass. Thought you would like to see my latest flower creation - a pink Morning Glory. I've just discovered that felt is a lovely medium to use for machine embroidery and I think adds to the felted flower.

 Enjoy the weekend - even though it's to be a bit colder here in the UK.
Bye, Ali


Bye, Ali
18 March 2012
i'd rather be

I've been putting off the ironing for quite a wee while. Now all is left is sorting out the socks. Where do all the odd socks go?......I must have at least a dozen odd socks languishing at the bottom of the laundry basket.
I'd rather be knitting / sewing / felting well absolutely anything other than housework.
On a craftier note I have finished my felted Stargazer Lily. one of the flower samples for the latest City and Guild piece. Ive included a few photos....


29 February 2012
get organised
No matter how I try my handbag degenerates into chaos. My pen always fall to the bottom of my bag. A friend showed me a wet felted pen holder which she bought ,which slips over a pen. I thought it was a brilliant idea and just what I need to stop me digging for my pen. I made up a pattern based on the holder which she showed me....written up below. The pattern uses felted wool. I hope someone can make use of it.
Thats all for now, Ali
Thats all for now, Ali
Knitted felted pen holder/cosy

PATTERN IS COPYRIGHT PROTECTED
KNITTED ITEMS CAN ONLY TO BE USED
FOR PERSONAL USE OR CHARITY KNITTING
PATTERN IS NOT FOR RESALE
MATERIALS
Wash+ Filz -it! wool (not the fine
type)
four 5mm (US 8) dpns
ABBREVIATIONS
rd – round
k- knit
p – purl
st(s) – stitch(es)
kfb – increase, knit front and back
sl – slip
psso – pass slip stitch over
tog - together
STEM
Cast on 6 sts with green yarn.
Divide sts evenly between three dpns
and join in the round.
Continue k every round until work
measures 40cms / 16ins or desired length.
Remember that the felting yarn
shrinks approximately 30% when washed.
FLOWER CENTRE
Change to pale pink wool.
NEXT rd : k.
Tuck two end yarns down tube.
NEXT 2 rds : k.
NEXT rd : (k2tog) 3 times (3 sts).
Pull wool through (thread yarn
through the 3 remaining sts).
Fasten off.
PETALS (make 4) knitted flat with 2
needles.
Cast on 2 sts with dark pink yarn with 5mm size needles.
ROW 1 : kfb, k1 (3 sts).
ROW 2 : p.
ROW 3 : kfb, kfb, k1 (5 sts).
ROW 4 : p.
ROW 5 : kfb, k2, kfb, k1 (7 sts).
ROW 6 : p.
ROW 7 : sl1, k1, psso, k to last 2
sts, k2tog (5 sts).
ROW 8 : p.
ROW 9 : sl1, k1, psso, k1,
k2tog (3 sts).
Cut yarn and leave sts on needle.
Continue making three more petals
leaving a long yarn tail on the final petal.
Thread the yarn on the last petal
through all the stitches of the four petals on the needle.
Pull tight.
Place around the flower centre, knit side facing up and
with a few stitches complete the circle.
Sew the petals to the centre by
sewing back and forwards through the tube.
Darn all loose yarn tails on petals
and stem away.
Insert a biro (without the ink part)
into the bottom end of the tube.
FELTING PROCESS
1. Place the knitted flower into the
washing machine, along with an old pair of jeans or towel (for agitation) and a
colour catcher.
2. Set the machine for a 40 degree
wash and a short spin.
When flower comes out of machine
reshape petals and stem, remove biro.
3. Dry flat.
4. If the base of the stem has
felted ease an opening by inserting a knitting needle.

15 February 2012
in the pink

For my next City and Guild piece, I'm doing a collection of felted flowers.....all pink. I do like to sneak a wee bit of knitting into these projects, so I've started with a knitted felted flower. I've used Wash+filz-it! wool which felts beautifully in the washing machine - what could be easier. I've written the pattern for the knitted felted rose and posted it (see below) so hopefully somebody can make use of it.
Bye, Ali
Knitted Felted Rose

THIS PATTERN IS COPYRIGHT PROTECTED
PLEASE ONLY USE THE KNITTED ITEM FOR PERSONAL USE OR CHARITY KNITTING - DO NOT SALE FOR PROFIT
MATERIALS
Wash+Filz-it! wool (not the fine type)
For the rose I used rose pink with a scraps of bright pink
For the leaf I used olive green
8mm (US 11) needles or similar
8mm (US 11) dpns or similar
sewing thread or finer yarn
brooch back or safety pin if required
ROSE
Cast
on 21 sts with 8mm needles or similar in rose pink.
ROW
1 : (k1, kfb) rpt to last st, k1 (31
sts).
ROW
2 : p.
ROW
3 : (k1, kfb) rpt to last st, k1 (46
sts).
ROW
4 : p.
ROW
5 : (k1, kfb) rpt to last 2 sts, k2 (68 sts)
ROW
6 : p.
ROW
7 : k.
ROW
8 : p.
Change
to bright pink yarn (optional)
Cast
off purlwise.
LEAF
Cast
on 3 sts with 8mms dpns or similar in olive green.
I-cord
for 10cms / 4ins.
leaf
is knitted flat.
ROW
1 : kfb, kfb, k1 (5 sts).
ROW
2 : p.
ROW
3 :
kfb, k to last 2 sts, kfb, k1 (7 sts).
ROW
4 : p.
ROW
5 : kfb, kfb, k to last 3 sts, kfb, kfb, k1
(11 sts).
ROW
6 : p.
ROW
7 : kfb, kfb, k to last 3 sts, kfb, kfb, k1
(15 sts).
ROW
8 : p.
ROW
9 : sl1, k1, psso, k to last 2 sts (k2tog)
(13 sts).
ROW
10 : p.
ROW
11 : sl1, k1, psso, k2, k2tog, k1,
k2tog, k to last 2 sts, k2tog
(9
sts).
ROW
12 : p.
ROW
13 : sl1, k1, psso, k to last 2 sts (k2tog)
(7 sts).
ROW
14 : p.
ROW
15 : sl1, k1, psso, k to last 2 sts (k2tog)
(5 sts).
ROW
16 : p.
ROW
17 : sl1, k1, psso, k1, (k2tog) (3 sts).
ROW
18 : p.
ROW
19 : sl1, k1, psso, k1, pass the right stitch over the left stitch.
Fasten
off.
2. Place in the washing machine with a pair of old jeans or towel (for agitation) and a colour catcher.
3. Set the machine for a 40 degree wash and a short spin.
4. When pieces come out of the washing machine reshape while still damp.


5. Dry flat.
ASSEMBLY
1. The rose will naturally curl round to form a flower shape. Keep the purl side facing upwards.
2. Sew the flower together with matching sewing thread or fine yarn.
3. Sew the leaf to the back of the flower. Place it diagonally across, turning the rose right way round to see if you have the leaf in the right position.


4. Sew large brooch back or safety pin to the back if you want a corsage. alternatively sew onto item such as hat scarf etc.
copyright Ali Hogg 2012
28 January 2012
starlit vessel
I have just finished my first piece for the city and guilds diploma. It is a felt vessel inspired by galaxies, nebulous and stars.


It is wet felted with merino wool, Angelina fibre for a bit of sparkle and embellished with swarovski crystal beads to give a bit of a twinkle. Now I have to finish the accompanying book and that's one craft pathway completed. Felting is new to me but I'm really enjoying even if all the rolling is a bit exhausting. The resulting items are so tactile and better still, virtually unbreakable.
Bye, Ali


It is wet felted with merino wool, Angelina fibre for a bit of sparkle and embellished with swarovski crystal beads to give a bit of a twinkle. Now I have to finish the accompanying book and that's one craft pathway completed. Felting is new to me but I'm really enjoying even if all the rolling is a bit exhausting. The resulting items are so tactile and better still, virtually unbreakable.
Bye, Ali
24 January 2012
for Nancy B
Nancy contacted me recently regarding a correction to ROW 17 to the leaf pattern. Nancy .....for ROW 17, slip 1 stitch onto the right needle, then knit a stitch. Now you have two stitches on the right needle. The next thing is psso, which is pass slipped stitch over. You do this on the two stitches on the right needle, passing the first slipped stitch over the knitted stitch. Once this is done there is only 1 stitch left on the right needle and 13 stitches on the left needle. Then it is a case of following the pattern, k4, p1, k1, p1, k4, k2tog. Hope this helps.
There has also been a blip on the blog with links to patterns not working and a resulting blank page. Ive tried to sort it out but it is a general problem.
There has also been a blip on the blog with links to patterns not working and a resulting blank page. Ive tried to sort it out but it is a general problem.
Subscribe to:
Posts (Atom)