21 July 2013


PLARN BOWL


THIS PATTERN IS COPYRIGHT PROTECTED.
 DO NOT REPRODUCE PATTERN.
 DO NOT SELL ITEMS KNITTED FROM THIS PATTERN FOR PROFIT - 
ONLY FOR PERSONAL OR CHARITABLE USE

DIMENSIONS : height of bowl aprox 4cms (1¾ ins)
                      width of bowl aprox 8cms (3¼ ins)

ABBREVIATIONS
rd(s): rounds(s)
st(s): stitch(es)
rpt : repeat
k: knit
sl: slip
psso: pass slip stitch over
tog: together 

MATERIALS
3 fine supermarket bags made into plarn (see PLARN TUTORIAL click here)
4 dpns size 6.50mm (US 10½)
tapestry needle
scissors 

NOTES ON KNITTING PLARN
Plarn takes a bit of getting used to, it is quite stiff to knit with, although there is a little stretch to it. It is slow to knit up.

You can either make up a lot and roll the plarn into a ball or just make up one bag and add to it as you go along adding more plarn to the end loop.
 

BOWL
Knitted from the rim to the base.
Cast on 36 sts (cable cast on is the best method as it produces a firm rim).
Divide sts – 12 on each of the three dpns.
Rds 1 - 6: k (right side will eventually be the inside of the bowl).
Tug work down as you go, by holding the needle in left hand and pulling at the cast on edge.
Rd 7: (k4, sl1, k1, psso) rpt to end of rd (30 sts).
Rd 8: k.
Rd 9: (k3, sl1, k1, psso) rpt to end of rd (24 sts).
Rd 10: k.
Rd 11: (k2, sl1, k1, psso) rpt to end of rd (18 sts).
Rd 12: (sl1, k1, psso) rpt to end of rd (9 sts).
  • Cut plarn leaving a tail of about 15cms (6ins) and thread onto tapestry needle.
  • Pull threaded yarn through the 9 sts, removing them from the needles.
  • Pull tight.
  • Reinforce by running plarn again through the 9 sts. Make a few sts to secure, then loose plarn tail in work.
  • Loose tail at cast on edge on right side.
  • Turn reverse side outwards.
  • Pull and stretch the bowl until it is a good shape.

 
copyright Alison Hogg 2013 


14 July 2013

projects

I have several projects on the go at the moment. Firstly, are the dreaded curtains, I hate this sort of sewing!

Then, I am crocheting a granny square blanket. I followed Bunny Mummy's Tutorial for this - click here. I'm turning the work after each round to avoid the blanket twisting. I am not a great crocheter and progress is very slow, it grows ever so slightly everyday, but is a very relaxing TV project.

  
I have also been meaning to experiment with different materials for knitting such as plastic, fabric, cord etc. So I've started off with making my own plarn or plastic yarn (see tutorial below). Supermarket bags now cost 5p in Northern Ireland, so thought I better hurry experimenting with plarn, before the plastic bag becomes totally extinct.
 
 
To follow up the plarn tutorial, I'm in the process of writing up a knitting pattern using the plarn. There seems to be lot of crochet patterns on the net, but few knitting patterns especially using dpns. It will only be a small project, suitable   for anyone looking for an introduction to knitting with plarn. Hoping to post that next week sometime. 
 
 
Bye for now, Ali.


plarn tutorial

Use fine supermarket grocery bags.

1.Tuck in sides of bag and smooth plastic.


2. Fold bag lengthwise.


3. Fold bag lengthwise again.


4. Snip off handles and fused edge at the base of the bag. Discard these pieces.


5. Cut the bag into 1 inch (2.5cms) strips, just measure by eye.


6. Unravel strips to form loops.


7. To join loops place Loop B under Loop A.


8. To knot the two loops. Lift up the end of Loop B which has just been placed under Loop A. Insert the other end of Loop B through the lifted up end. Keep Loop A taut.


9. Gentle tug both loops to form knot. Do not pull too hard or the plastic strips will tear.


10. Make knot smaller by easing it towards the centre with fingernails.


11. Size of knot.


12. Plarn can be either rolled into a ball or can be added to, as you go along. Just add more loops to the end loop.


NOTES ON KNITTING PLARN
Plarn takes a bit of getting used to, it is quite stiff to knit with, although there is a little stretch to it. It is slow to knit up.

8 July 2013

bertie bunny

I have now finished Julie's boy bunny pattern. Again he was a very enjoyable knit and the pattern was very detailed leaving nothing to guesswork
So here's Bertie the blue eyed bunny.......


was it something I said?
 
but
it's a happy ending for Roberta and Bertie
they were made for each other!
 
 
Patterns available from Little Cotton Rabbit, click here. There is also a new pattern with a wardrobe of different dresses.

All the best, Ali. 

28 June 2013

roberta rabbit

I finished my rabbit and I'm very pleased as to how she turned out. The wee rabbit proved to be a fun, interesting knit. She assumed a definite personality as I was knitting her up and came alive when I sewed on her features.
Some photos of Roberta ......


She looks a wee bit lonely so I'm knitting a friend for her. Patterns are by the designer Little Cotton Rabbits - click here
Have a good weekend, Ali.


20 June 2013

off the needles

After a marathon of a knit, I have eventually finished the Curve of Pursuit blanket. The short rows kept the knitting interesting but even so this is a definite one off project. For details of pattern, by Woolly Thoughts click here
Some photos of my finished blanket.


Now that the blanket is off the needles I've started a smaller project. On the needles is the girl bunny written by the extremely talented Julie from Little Cotton Rabbits. Hoping to do the boy bunny as well. For details of these patterns click here.


Now all I need is some nice summery weather so I can knit in the garden,
Bye for now, Ali.

13 June 2013

school of art exhibition

Our class met up for lunch yesterday and then a visit to the Belfast School of Art Annual Exhibition.
We headed straight for the textiles - no surprise there.
Here's some photos of things which caught my eye. Apologies as I didn't get all the artists names.
I loved the map print on this dress.


This was a stunning piece by Hannah Bell.


Some hand/machine embroidery.


Some machine embroidery by Liz McCulloch with linen as the theme.


I caught a glimpse of myself in this piece by Jena Magenus


The exhibition runs until Saturday the 15th June so still time to go.
Bye for now, Ali.

29 May 2013


DAISY CHAIN NECKLACE
 

THIS PATTERN IS COPYRIGHT PROTECTED
 ONLY FOR PERSONAL OR CHARITABLE USE
ITEMS KNITTED FROM THIS PATTERN CANNOT BE SOLD FOR PROFIT
 DO NOT REPRODUCE OR USE FOR ANY COMMERCIAL USE

ABBREVIATIONS
st(s): stitch(es) 

MATERIALS
2 dpns size 2.25mm (US 1)
4 ply (fingering) yarn in white, green and yellow
(I used Debbie Bliss Rialto 4 ply in white, leaf and amber)
darning needle
safety pin 

This pattern uses i-cord technique for a video tutorial see the knitting help website - click here (scroll down page)

PETALS
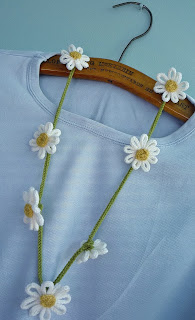
For the necklace in the photo, I made 8 flowers.
With white, cast on 2 sts, leaving a long yarn tail aprox 20cms.
Continue with i-cord until work measures aprox 40cms.
Break yarn and place 2 sts onto safety pin.

DAISY CENTRE and STEM
With yellow, cast on 2 sts.
Continue with i-cord until work measures 6cms.
Change to green yarn. Leave a long yarn tail for both the yellow and the green yarn (the tails should be aprox 20cms long).
Continue with i-cord until the green stem measures aprox 10cms.
For the necklace in the photo, I used six stems of 10cms and two stems of 15cms to give a random look.
Any length of stem can be used, always i-cord a further 1cm to the required length as this is needed to make the “link”.
Fasten off. 

TO ASSEMBLE
PETALS
Thread the yarn tail onto a darning needle.
Measure 2cms along the i-cord and fold. Thread needle through the base of the first petal.

 Continue with concertina folding and threading the needle though the base of the petals.
 
Continue folding and sewing until there are nine petals.
Remove 2 sts from safety pin and rip back to the end of the ninth petal.
Fasten off the two sts and loose yarn in petal.
With the other yarn tail join the petals in a circle and pull the yarn tight.
Secure yarn and then loose yarn tail in one of the petals.
Pull petals into shape.

FLOWER CENTRE
Push the end of the yellow i-cord through the gap at the centre of the petals.
This can be done by threading the end yarn tail and then pushing the needle through the centre gap.
 
 
Pull the other yellow yarn tail through as well, leaving the green yarn tail on the reverse side of the petals.
 
 
Coil the yellow i-cord, sewing as you go to form the centre. Catch the petals while sewing the coil.
 
Loose both yellow yarn tails in the centre.
 
 
Turn the daisy over and with the green yarn tail sew long stitches along each petal securing the petal to the stem.
 
 
 TO MAKE THE CHAIN
Fold the end of the stem over by 1cm.
 
  
Sew stitches to make a small gap, loose the yarn tail in the stem. Then thread the next flower through.
 
 
For the final “link” sew the end of the stem around the daisy head.
 
 
Adapt the length of the stems to make a necklace, bracelet or crown.

 
copyright Alison Hogg 2013

25 May 2013

coming up daisies

There were a lot of daisies growing through our grass, just got some photos taken before the grass was mowed.


I remember as a child going to the park, picking daisies and making daisy chains, which were then used as necklaces, bracelets and crowns.

 
This memory has inspired my latest pattern - a knitted daisy chain necklace. The weather was nice today so I was able to sit in the garden and knit.
 
 
Hopefully I'll have the pattern written up next week sometime.
Enjoy the rest of the weekend, Ali.