22 January 2013

new needles

Earlier this month, I made a major investment, in the form of new knitting needles. My old bent dpns have come mostly from charity shops. These new ones are made from carbon fibre, they are very light and are supposed to be very strong. I am very tight knitter and with these, the stitches glide easily from needle to the other needle. They look and feel lovely....


The brand is "Knitpro Karbonz" and I bought them online from the Wool Stack. 

 
The only downside with the needles is they put pressure on the index finger of the left hand when knitting, but I'm sure I'll get used to that.

This is definitely sitting in knitting weather, pockets of Northern Ireland got a lot of snow last night and of course it was us, on the edge of the Castlereagh Hills.  So have to post some snowy pictures.....


and a glimmer of hope.....some daffodils bravely poking out from under the snow.


Take care and keep warm, Ali


15 January 2013

nuno felt

I have eventually finished my first piece for this year, for the City and Guilds class. I made a set of felt accessories, including a pair of wristwarmers and a flower corsage. The inspiration for these items came from an annual flower from my garden last summer. It is a beautifully veined petunia......


A pretty flower but I looked up the "meaning" of it and it means anger and resentment!
My two pieces are made from nuno felt using dyed silk gauze as a ground.


I tried to make the flower corsage as similar to the petunia flower as possible.

 
I embellished both items with seed beads in various sizes.


Now just the paperwork to do and the accompanying book, better hop to it
Bye for now, ali.

12 January 2013

raphoe


Due to a hockey match we all went to Raphoe today. Needless to say I wasn't the one playing, just spectating.
I took the chance to have a look around the town when I was up there, as my nanny was born there. Raphoe is a plantation town in County Donegal, just over the border. My nanny lived in the gate lodge to the "big house" or the castle, where her father was a land steward. Eleven of them lived in this house!
I took some photos .....
gate lodge

castle

Church of Ireland, St Eunan

doorway in the Diamond

Enjoy the rest of your weekend, I'll be working on my City and Guild felt piece, photos to follow, Ali.


10 January 2013

yum yum


Can't believe these yummy choccies have survived sixteen days after Christmas.


Don't think they will last much longer though!


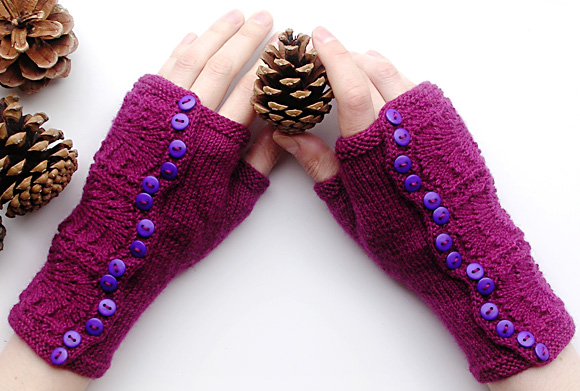
Bought some yummy yarn as a wee Christmas present for myself....Lang, Mille Colori (Socks and Lace). I bought this in the market where the light isn't too good, I thought it was shades of purple but it is in fact, berry pinks, still beautiful and good enough to eat!


I searched for ages to find a nice pattern, thought I might do socks but in the end decided on a very pretty pair of fingerless mitts (see right) - Spatterdash mitts by Dagma Mora, available as a free pattern on the Knitty site click here


Here's a close up of the wave pattern of the flap.
 

3 January 2013

s.w.a.l.k.


I see the sweets and chocolates for Valentines Day are now on the shelves in the shops. So I guess its time for me to post my idea for a quick and easy, woolly Valentines gift. I have also written instructions on how to i cord.

KISS KEYRING 

THIS PATTERN IS COPYRIGHT PROTECTED. DO NOT REPRODUCE PATTERN. DO NOT SELL ITEMS KNITTED FROM THIS PATTERN FOR PROFIT ONLY FOR PERSONAL OR CHARITABLE USE

MATERIALS

two dpns size 2.50mm (US  1½)scraps of dk (8ply) yarn
darning needle
sewing needle & matching sewing thread
keyring or phone lanyard
INSTRUCTIONS
Kisses (make 4)
1. Cast on 3 sts.
2. Continue with i cord until work measures 4.5cms (2.75ins)
3. Break yarn, thread onto needle, bring yarn round the back of work and thread through the three stitches on the needle.
4. Pull tight and make a few stitches to secure.
5. Loose yarn in i cord.
~~~~~~~~~~~~~~~~~~~~~~~~~~~~~~~~~~~~~~~~~~~~~~
I CORD TECHNIQUE
1. With the dpns cast on 3 sts.
2. Knit 3 sts.
3. Do not turn work, but slide the 3 sts to the other end of the dpn.
4. Keep yarn round the back of work , keep yarn tight and knit the 3 sts once again.
5. Continue until cord measures the desired length.
~~~~~~~~~~~~~~~~~~~~~~~~~~~~~~~~~~~~~~~~~~~
TO ASSEMBLE
1. Darn away loose yarn ends.
With small items I always sew together with sewing thread in a matching colour, for a neater finish
2. Place one cord on top of the other to form an "x".

3. Stitch back and forward in the centre where the two cords intersect, also sew where the edge of one cord crosses the other.
4. Turn "x" over and sew edges where cords cross.
5. Make another "x" with the other two cords.
6. Sew end tips of the two "x's" together.
7. Attach keyring or phone lanyard. Sew securely.
8. Pull x's into shape, cover with a cloth and press flat.
copyright Alison Hogg 2013

31 December 2012

happy new year


Many many thanks for those who visited my blog in 2012. I hope you were able to make use of the free patterns and craft ideas. Please call back often in 2013. Here's hoping you have a happy and healthy New Year.

 
Best wishes for 2013, Ali.

24 December 2012

bah humbug


Christmas is not my favourite time of the year, but for those who enjoy the festivities have a great time.
For others like myself......hang on in and it will soon be all over. Life, shops, traffic etc will hopefully return to some sort of normality.
Bye, Ali.

22 December 2012

monsters + zombies


My son is quite grown up now....but not too old to enjoy wearing his monster slippers - a birthday present.


I do like to knit him a novelty Christmas gift. When I saw this pattern called Tombie the Zombie by Phoeny I just had to knit it. I think he will appreciate my efforts, since he likes films and games involving zombies!!!

Here's my finished zombie


The limbs, head etc are detachable.....


here's a close up of the head....


It is such a well written pattern and great fun to knit. I knit the body, head, limbs on dpns and had no bother converting the pattern as I went along. The pattern is available for sale on Ravelry - click here.
Oh well on with the rest of the Christmas preparations, Ali
 

15 December 2012

oh christmas tree

OK so maybe I'm a bit late putting up the tree this year. Things are running a bit behind schedule due to various flus and illnesses which have afflicted our household. Had a quiet afternoon to myself today so I put it up, at least that's one thing done. A friend made me the loveliest ribbon Christmas trees. The photo does not do them justice - there is a lovely movement to then as they twist and spin. They have pride of place on the tree.....
That's enough Christmas preparation for today now, don't want to get to carried away! 

30 November 2012

happy birthday dude

My son celebrated his 16th birthday this week. I cant believe he is so grown up and is now taller than me - much to his delight, I think I will have to get a higher hairstyle! It just seems like yesterday since we were sitting on the sitee together, watching the Teletubbies.
He is a wee bit camera shy, so I had to make do with taking a photo of the cake....

 
I finished the hexaflexacube in time for his birthday. The pattern suggested invisible thread to join the triangles. However, I found this a bit fiddly so ended up using 4ply black sock yarn.....I think I should have persevered with the invisible thread. Not the prettiest project I've ever done, but then my son doesn't do pretty and quite liked his cushion.....


Have a good weekend, Ali.
 

26 November 2012

continental market

One thing I love about the run up to Christmas is the market at the front of the City Hall.
 
I remembered to take my camera this year and took a few photos of things which appealed.


loads of sweet goodies
mmmmmhhh


some felted baby booties
cute
 

matryoshka dolls
colourful ladies
 
 
the hobby horses


Bye, Ali
 

20 November 2012

hooked

A friend who knows I like novelty knits, sent me a link for a hexaflexacube cushion. Here's one side of it.....
 
It is in fact  a folding cushion, with six different sides.
It is from the Woolly Thoughts site, which brings out the mathematics in knitting and crocheting - an inspirational site. There are lots of paper hexaflexagons on the Internet with tutorials of how to fold them. After seeing it I thought I would have a go. I like knitting things for my son and as he doesn't particularly like woolly jumpers, I thought this project might appeal. One problem though it is crochet so again another challenge. It requires eighteen triangles so lots of practise with double crochet. (UK term). I must say that crocheting has proved to be the new Temazepan as I can hardly get my eyes open along the stretches of the double crochet.
 
Not sure how it will work out as my tension is all over the place and the triangles are hardly equilateral.....Ill let you know how I get on when I get to the assembly stage.


Bye, Ali.

9 November 2012

eyelash yarn beads

If you have some eyelash yarn in your stash a good way of using it up is to make some beads. The yarn is melted and the result is an interesting textured bead which could be used in many different projects. I've written up a tutorial if you want to have a go......its quick and fun!


WHAT YOU NEED
heat tool
metal knitting needle
synthetic eyelash yarn
pin


HEALTH AND SAFETY
Care must be taken when using a heat gun. The metal needle will conduct heat so protective gloves should be worn. The room should be well ventilated. Anyone suffering from respiratory problems should wear a mask as an extra precaution. Once beads are melted they will be hot so care should be taken while handling them.

METHOD
1. Cut lengths of eyelash yarn. Length depends on the size of the required beads. I cut lengths of approximately 40cms (16ns) - this results in beads about  3cms (1.25ins) long.
2. Wrap yarn round knitting needle and pin to hold in place.


3. Melt and manipulate yarn with the heat tool.
4. Leave to cool and remove pin and bead from knitting needle.
5. Size of hole will depend on the diameter of the knitting needle.


Bye for now, Ali

30 October 2012

happy halloween

I saw a photo of a crocheted spider web recently on facebook and wanted to have a go making one. After having a hunt on Ravelry found a great pattern Spider Web Snowflake by Deborah Atkinson. Its a good well written pattern and free at that. After I got over the confusion between UK and US crochet terms, I got on OK. My spider's legs could have done with a bit more glue though. A fun Halloween project!
Here's how I got on..


My own bit of yarn bombing in the hall.......

 
Dont eat too  much apple tart!
bye, Ali.