27 February 2013

chirpy chirpy cheep cheep

Due to a "request" from our neighbours, at lot of our trees have had to be lowered along the boundary line. Unfortunately this will deter birds nesting this year. The magpies which live and nest in one of the trees have already found alternative accommodation. With nesting and spring in mind, I've come up with a wee pattern - two chicks in a nest.


The pattern is for the nest and the chicks. The knitted nest, alone could be used as an Easter gift by adding a few mini eggs or a creme egg. Alternatively you could knit the baby birds to fit inside. Ive taken the photos this morning so just have to finish writing the pattern. Hopefully I will be posting it in the next few days, for the start of the nesting season.
 
 
Bye for now, Ali


23 February 2013

fingerless mitts

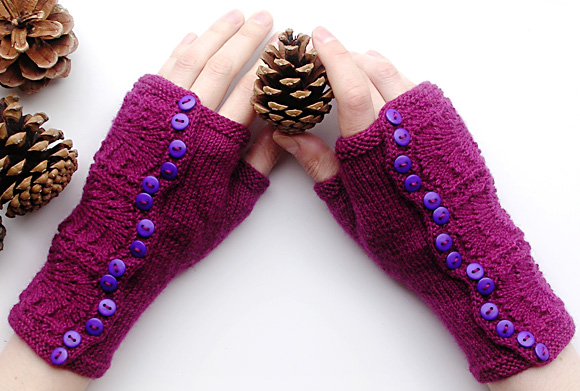
This started out as a Christmas project, to be finished over the holiday period. However I just finished it last week! Despite the pattern being clear and well written I found it hard to concentrate on the "wave" pattern and therefore there was a lot of ripping out. Here's some photos.........


The pattern - Splatterdash Wristwarmers by Dagma Mora is available on the Knitty website, click here. I used Lang Yarns, Mille Colori and the colourway was Berry. It was a pretty yarn, but difficult to knit up as it split.
Now that this project is out of the way, I'm writing a pattern for a nest complete with chicks. There is also the small matter of the City and Guilds final piece - I'm hoping to do a felt panel but it is very much on "the drawing board" at the moment.
Enjoy the rest of your weekend, Ali

17 February 2013

andy warhol

The Andy Warhol exhibition has arrived in Belfast and can be seen at the MAC, St Anne's Square.


There is a selection of 232 of his works, spanning his entire career. Here's a snippet of the exhibition.......
Self portrait Strangulation (1978)


Silk screen poster.


Silver clouds (1966) - Helium filled metallised plastic film. This piece was my favourite it looked like floating pillows.


The exhibition is on until the 28th April so plenty of time to go and see it, I'll probably make a return visit.
Bye, Ali


13 February 2013

woolly heart


Although I'm not a great romantic I thought I would make a wee bit of an effort this year, for St Valentines Day. While browsing in Ravelry's pattern base I found a knitted heart card. It's a free pattern by Elizabeth Murphy, details on her site The Sitting Tree. Here's a sneak preview of my finished card.


The card was quick to make, the pattern easy to follow and well written. I didn't have any worsted weight yarn so used two stands of double knit (8ply). Hope he appreciates my efforts.


Bye, Ali.


10 February 2013

birthday flowers

My birthday was last week and I received the loveliest bunch of flowers, indigo anemones and pale pink tulips. The anemones where shut tight when I received them but have burst into life today....


I couldn't resist a bit of photo editing......


I was also inspired to get the paints out. This one was sketched with watercolour pencils and then painted.

.


 For this one I just used watercolours - its a bit looser and I much prefer it.
 
 
Not exactly masterpieces but great fun to do.
Bye for now, Ali,
GWRVNCDM5MEM


3 February 2013

ribbon rose


I have been meaning to write this tutorial up for some time and just getting round to it today. The ribbon rose is folded in the same way that I used to make newspaper sticks for the fire as a child. It is a bit fiddly and may take a bit of practise to get a satisfactory rose shape. You could experiment with different width of ribbon. 

WHAT YOU NEED
aprox 80cms (30ins) of ribbon width 2.5cms (1ins) for the rose
scraps of ribbon for further decoration
needle and thread
bead (optional)
scissors


HOW TO MAKE IT
Have needle threaded, with a double knotted thread, in a matching colour. 
1. Fold the length of ribbon in half.
 
 
2. Fold the top part of ribbon to form a mitre.


3. Fold the underneath half of the ribbon over the mitre. 
 
 
4. Fold the other half of the ribbon over.  
 
 
5. Continue folding backwards and forward about 14 times. 
6. Keep hold of the two ends of the two ribbons and let the rest of the ribbon "pop" out.
 
 
7. Pinch the ribbon, and pull one of the lengths of ribbon.


8. Pull gently until the rose shape forms. With needle and thread sew back and forward from the centre of rose to the back, make sure all pieces of ribbon are held secure. Attach bead to centre of flower.
 
 
9. Fold the two loose ends to the back of the rose and sew in place.
 
 
10. You can build up further pieces of ribbon at the back of the rose.
11. Fold the ends of a piece of ribbon so that they overlap at the centre. With a needle and double thread sew along the centre line, pull tight to gather and fasten off.
 
 
12. Attach to the back of the rose.
 
This would make a lovely corsage for a wedding or a pretty way to decorate a wrapped gift for someone special.
Bye for now, Ali.


22 January 2013

new needles

Earlier this month, I made a major investment, in the form of new knitting needles. My old bent dpns have come mostly from charity shops. These new ones are made from carbon fibre, they are very light and are supposed to be very strong. I am very tight knitter and with these, the stitches glide easily from needle to the other needle. They look and feel lovely....


The brand is "Knitpro Karbonz" and I bought them online from the Wool Stack. 

 
The only downside with the needles is they put pressure on the index finger of the left hand when knitting, but I'm sure I'll get used to that.

This is definitely sitting in knitting weather, pockets of Northern Ireland got a lot of snow last night and of course it was us, on the edge of the Castlereagh Hills.  So have to post some snowy pictures.....


and a glimmer of hope.....some daffodils bravely poking out from under the snow.


Take care and keep warm, Ali


15 January 2013

nuno felt

I have eventually finished my first piece for this year, for the City and Guilds class. I made a set of felt accessories, including a pair of wristwarmers and a flower corsage. The inspiration for these items came from an annual flower from my garden last summer. It is a beautifully veined petunia......


A pretty flower but I looked up the "meaning" of it and it means anger and resentment!
My two pieces are made from nuno felt using dyed silk gauze as a ground.


I tried to make the flower corsage as similar to the petunia flower as possible.

 
I embellished both items with seed beads in various sizes.


Now just the paperwork to do and the accompanying book, better hop to it
Bye for now, ali.

12 January 2013

raphoe


Due to a hockey match we all went to Raphoe today. Needless to say I wasn't the one playing, just spectating.
I took the chance to have a look around the town when I was up there, as my nanny was born there. Raphoe is a plantation town in County Donegal, just over the border. My nanny lived in the gate lodge to the "big house" or the castle, where her father was a land steward. Eleven of them lived in this house!
I took some photos .....
gate lodge

castle

Church of Ireland, St Eunan

doorway in the Diamond

Enjoy the rest of your weekend, I'll be working on my City and Guild felt piece, photos to follow, Ali.


10 January 2013

yum yum


Can't believe these yummy choccies have survived sixteen days after Christmas.


Don't think they will last much longer though!


Bought some yummy yarn as a wee Christmas present for myself....Lang, Mille Colori (Socks and Lace). I bought this in the market where the light isn't too good, I thought it was shades of purple but it is in fact, berry pinks, still beautiful and good enough to eat!


I searched for ages to find a nice pattern, thought I might do socks but in the end decided on a very pretty pair of fingerless mitts (see right) - Spatterdash mitts by Dagma Mora, available as a free pattern on the Knitty site click here


Here's a close up of the wave pattern of the flap.
 

3 January 2013

s.w.a.l.k.


I see the sweets and chocolates for Valentines Day are now on the shelves in the shops. So I guess its time for me to post my idea for a quick and easy, woolly Valentines gift. I have also written instructions on how to i cord.

KISS KEYRING 

THIS PATTERN IS COPYRIGHT PROTECTED. DO NOT REPRODUCE PATTERN. DO NOT SELL ITEMS KNITTED FROM THIS PATTERN FOR PROFIT ONLY FOR PERSONAL OR CHARITABLE USE

MATERIALS

two dpns size 2.50mm (US  1½)scraps of dk (8ply) yarn
darning needle
sewing needle & matching sewing thread
keyring or phone lanyard
INSTRUCTIONS
Kisses (make 4)
1. Cast on 3 sts.
2. Continue with i cord until work measures 4.5cms (2.75ins)
3. Break yarn, thread onto needle, bring yarn round the back of work and thread through the three stitches on the needle.
4. Pull tight and make a few stitches to secure.
5. Loose yarn in i cord.
~~~~~~~~~~~~~~~~~~~~~~~~~~~~~~~~~~~~~~~~~~~~~~
I CORD TECHNIQUE
1. With the dpns cast on 3 sts.
2. Knit 3 sts.
3. Do not turn work, but slide the 3 sts to the other end of the dpn.
4. Keep yarn round the back of work , keep yarn tight and knit the 3 sts once again.
5. Continue until cord measures the desired length.
~~~~~~~~~~~~~~~~~~~~~~~~~~~~~~~~~~~~~~~~~~~
TO ASSEMBLE
1. Darn away loose yarn ends.
With small items I always sew together with sewing thread in a matching colour, for a neater finish
2. Place one cord on top of the other to form an "x".

3. Stitch back and forward in the centre where the two cords intersect, also sew where the edge of one cord crosses the other.
4. Turn "x" over and sew edges where cords cross.
5. Make another "x" with the other two cords.
6. Sew end tips of the two "x's" together.
7. Attach keyring or phone lanyard. Sew securely.
8. Pull x's into shape, cover with a cloth and press flat.
copyright Alison Hogg 2013